Overview
The MongoDB PHP Library is a high-level abstraction for the MongoDB PHP extension, which you can use to connect to MongoDB and interact with data stored in your deployment. This guide shows you how to create an application that uses the MongoDB PHP Library to connect to a MongoDB cluster hosted on MongoDB Atlas and query data in your cluster.
Tip
MongoDB Atlas is a fully managed cloud database service that hosts your MongoDB deployments. You can create your own free (no credit card required) MongoDB Atlas deployment by following the steps in this guide.
Follow this guide to connect a sample PHP application to a MongoDB Atlas deployment. If you prefer to connect to MongoDB using a different driver or programming language, see our list of official drivers.
Download and Install
Install the MongoDB PHP extension
Run the following command to install the mongodb PHP extension:
pie install mongodb/mongodb-extension
Tip
Specify the PHP Extension Version
To install a specific version of the PHP extension, include the version number as shown in the following command:
pie install mongodb/mongodb-extension^2.0.0
Tto install a PHP extension version before v1.21, you must use the pecl command.
Create a project directory
From your root directory, run the following command in your shell to create
a directory called php-quickstart for this project:
mkdir php-quickstart
Select the tab corresponding to your operating system and run the following commands
to create a quickstart.php application file in the php-quickstart directory:
cd php-quickstart touch quickstart.php
cd php-quickstart type nul > quickstart.php
Install the MongoDB PHP Library
To install the MongoDB PHP Library, run the following command in your php-quickstart
directory:
composer require mongodb/mongodb
After installing the library, include Composer's autoload.php file by adding the
following code to the top of your quickstart.php file:
require_once __DIR__ . '/vendor/autoload.php';
After you complete these steps, you have a new project directory, a new application file, and the library dependencies installed.
Create a MongoDB Deployment
You can create a free tier MongoDB deployment on MongoDB Atlas to store and manage your data. MongoDB Atlas hosts and manages your MongoDB database in the cloud.
Create a free MongoDB deployment on Atlas
Complete the Get Started with Atlas guide to set up a new Atlas account and load sample data into a new free tier MongoDB deployment.
After you complete these steps, you have a new free tier MongoDB deployment on Atlas, database user credentials, and sample data loaded into your database.
Create a Connection String
You can connect to your MongoDB deployment by providing a connection URI, also called a connection string, which instructs the driver on how to connect to a MongoDB deployment and how to behave while connected.
The connection string includes the hostname or IP address and port of your deployment, the authentication mechanism, user credentials when applicable, and connection options.
Find your MongoDB Atlas Connection String
To retrieve your connection string for the deployment that you created in the previous step, log in to your Atlas account and navigate to the Database section and click the Connect button for your new deployment.

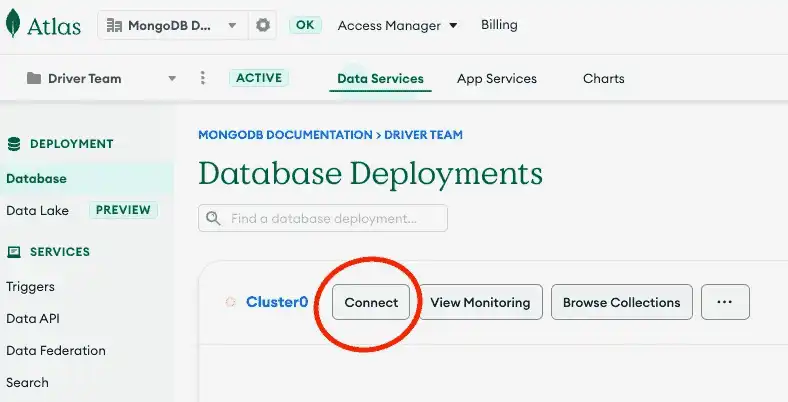
Then, select your user from the Select database user selection menu. Select "PHP" from the Driver selection menu and the version that best matches the version you installed from the Version selection menu.
Select the String tab in the Add connection string into your application code step to view only the connection string.

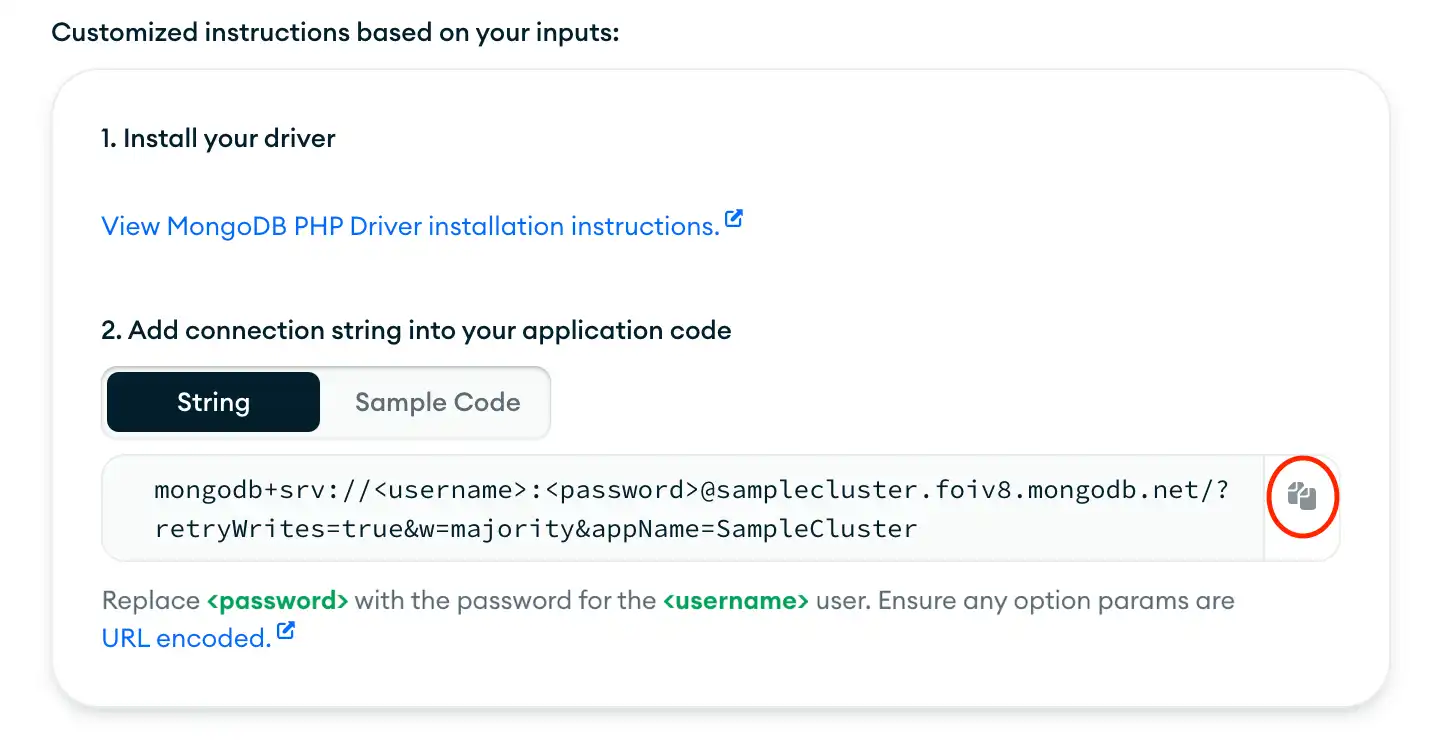
After completing these steps, you have a connection string that corresponds to your Atlas cluster.
Run a Sample Query
After retrieving the connection string for your MongoDB Atlas deployment, you can connect to the deployment from your PHP application and query the Atlas sample datasets.
Edit your PHP application file
Copy and paste the following code into the quickstart.php file, which queries
the movies collection in the sample_mflix database:
require __DIR__ . '/../vendor/autoload.php'; $uri = getenv('MONGODB_URI') ?: throw new RuntimeException( 'Set the MONGODB_URI environment variable to your Atlas URI', ); $client = new MongoDB\Client($uri); $collection = $client->sample_mflix->movies; $filter = ['title' => 'The Shawshank Redemption']; $result = $collection->findOne($filter); if ($result) { echo json_encode($result, JSON_PRETTY_PRINT); } else { echo 'Document not found'; }
Assign the connection string
Assign the MONGODB_URI environment variable to the connection string that you copied
from the Create a Connection String step of this guide. You can assign this
variable by running a shell command or creating a .env file in your application,
as show in the following tabs:
export MONGODB_URI=<connection string>
MONGODB_URI=<connection string>
Run your PHP application
In your project directory, run the following shell command to start the application:
php quickstart.php
The command line output contains details about the retrieved movie document:
{ "_id": { "$oid": "..." }, ... "rated": "R", "metacritic": 80, "title": "The Shawshank Redemption", ... }
If you encounter an error or see no output, ensure that you assigned the
proper connection string to the MONGODB_URI environment variable and
that you loaded the sample data.
After you complete these steps, you have a PHP application that connects to your MongoDB deployment, runs a query on the sample data, and returns a matching document.
Next Steps
Congratulations on completing the quick start tutorial!
Note
If you run into issues in this tutorial, ask for help in the MongoDB Community Forums or submit feedback by using the Rate this page tab on the right or bottom right side of this page.
In this tutorial, you created a PHP application that connects to a MongoDB deployment hosted on MongoDB Atlas and retrieves a document that matches a query.
Learn more about the MongoDB PHP Library from the following resources:
Learn how to configure your MongoDB connection in the Connect to MongoDB section.
Learn how to perform read and write operations in the CRUD Operations section.
Troubleshooting
This section addresses issues that you might encounter when installing the PHP library and its dependencies.
PHP Headers Not Found
You might see a header file error that resembles the following code when installing the PHP library:
/private/tmp/pear/install/mongodb/php_phongo.c:24:10: fatal error: 'php.h' file not found #include <php.h> ^~~~~~~
This error indicates that PHP's build system cannot find the necessary headers.
All PHP extensions require headers in order to compile. Those headers
must correspond to the PHP runtime for which the extension will be used.
The phpize command, which is invoked by pecl and pie, usually ensures that the
extension builds with the correct headers.
If you install a PHP runtime, the corresponding headers are not always automatically
available. On many Linux distributions, headers are often published under a
separate php-dev or php-devel package. On macOS, the default PHP runtime
does not include headers. Users typically need to install PHP and its headers by using
Homebrew.
Multiple PHP Runtimes Installed
If your system has multiple versions of PHP installed, each version will have
its own pecl, pie, and phpize commands. Additionally, each PHP runtime may
have separate php.ini files for each server application programming interface (SAPI),
such as FPM and CLI. If you installed the extension but it is not available at runtime,
ensure that you use the correct pecl or pie command and modify the appropriate php.ini
file.
To see which php.ini file a PHP runtime uses,
view the output of phpinfo() for that particular
SAPI. Additionally, you can use php_ini_loaded_file() and
php_ini_scanned_files() to determine
which INI files have been loaded by PHP.
To debug issues when the extension is not loaded, you can use the
detect-extension script provided in the tools directory. You can run this
script from the CLI or include it in a script accessible to your web server.
The tool finds potential issues and installation instructions for your
system. If you installed the library by using Composer, you can call the
script from the vendor directory as shown in the following code:
php vendor/mongodb/mongodb/tools/detect-extension.php
If you want to check configuration for a web server SAPI, include the file in
a script accessible from the web server and open it in your browser. Ensure that you
wrap the script in <pre> tags to properly format its output as shown in the following code:
<pre> require(...); </pre>
Loading an Incompatible DLL on Windows
Windows binaries are available for several combinations of a PHP version, thread safety setting (TS or NTS), and architecture type (x86 or x64). Failure to select the correct binary causes an error when attempting to load the extension DLL at runtime, as shown in the following sample output:
PHP Warning: PHP Startup: Unable to load dynamic library 'mongodb'
Ensure that you have downloaded a DLL that corresponds to the following PHP runtime properties:
PHP version (
PHP_VERSION)Thread safety (
PHP_ZTS)Architecture (
PHP_INT_SIZE)
In addition to the preceding constants, these properties can also be
inferred from phpinfo(). If your system has multiple PHP
runtimes installed, view the phpinfo() output for the correct environment.
You can also use the detect-extension script described in the previous section to determine the
correct DLL for your PHP environment.